MagicMirror²アドオン
1.MMM-iFrame-Ping
webページなどフレームみたいに切り取って表示可能です。例えばこれでYoutubeを再生しています。好きな位置に表示するということです。
<iframe width="853" height="480" src="https://www.youtube.com/embed/XMIc4uTAMh0?list=PLbIZ6k-SE9ShGEZ_wuvG3hatiC6jWJgVm" frameborder="0" allow="autoplay; encrypted-media" allowfullscreen></iframe>config/config.js file:
modules: [
	{
		module: 'MMM-iFrame-Ping',
		position: 'middle_center',	// This can be any of the regions.
		config: {
			// See 'Configuration options' for more information.
			url: "https://magicmirror.builders/", //url to display
			height:"100%",
			width:"100%",
			autoRefresh: true, //set to false for video
			updateInterval: 1, //in min. Only if autoRefresh: true
			displayLastUpdate: true,
			width: "100%", // Optional. Default: 100%
			height: "400px", //Optional. Default: 100px
			scrolling: "no"
			}
	},
]
2.MMM-GooglePhotos
Googleフォトの呼び出し用アドオンです。
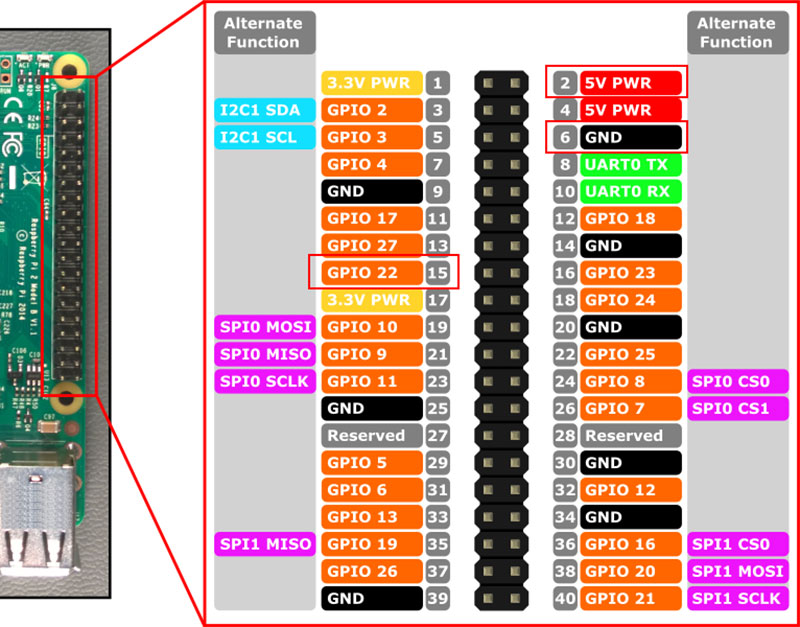
PIRセンサー(HC-SR501)で画面を節電するモジュールをインストールする
| HC-SR501側 | RaspberryPi側 |
|---|---|
| VCC | 2 (5V) |
| Out | 15 (GPIO22) |
| GND | 6 (GND) |
- モジュールのインストール モジュールは、MMM-PIR-Sensor を使います。モジュールのインストールは、piユーザでログインして、以下コマンドを入力します。
cd ~/MagicMirror/modules/
git clone https://github.com/paviro/MMM-PIR-Sensor.git
cd MMM-PIR-Sensor
npm install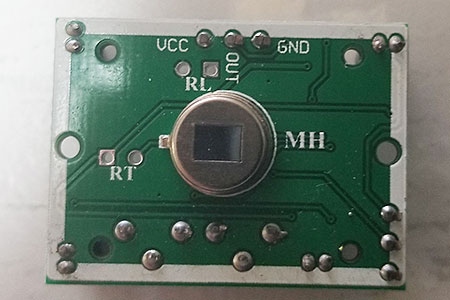
- GPIOの使用、HDMI制御を行うため、以下権限を追加します。
sudo usermod -a -G gpio pi
sudo chmod u+s /opt/vc/bin/tvservice && sudo chmod u+s /bin/chvt
- 設定ファイル
/home/pi/MagicMirror/config/config.jsのmodules: [ … ]の中に以下を挿入します。MMM-PIR-Sensor のExampleほぼそのままです。
        {
            module: 'MMM-PIR-Sensor',
            // Remove this line to avoid having an visible indicator
            position: "bottom_left",
            config: {
                // Turn HDMI OFF after 60 seconds of no motion,
                // until motion is detected again
                powerSavingDelay: 60,
                // Customizing the indicator
                presenceIndicator: "fa-eye",
              presenceOffIndicator: "fa-eye",
                presenceIndicatorColor: "#f51d16",
                presenceOffIndicatorColor: "#2b271c"
            }
        },
- 設定について
- 無信号状態でディスプレイが節電状態にならない場合、
supportCEC: true,を追加するといいでしょう。 powerSavingDelayは、センサが未感知状態になった後、設定した秒数が経過した後にディスプレイをOFFにします。presenceIndicator/presenceOffIndicatorを設定すると、positionで指定した位置(上記だと左下)に目の形をしたアイコンが出てきます。センサがONになると赤色、OFFになると黒色になるので、これでセンサの状態を確認できます。- リレーを接続してディスプレイの電源をON/OFFする場合、
relayPin、relayStateを設定します。
- 無信号状態でディスプレイが節電状態にならない場合、
画面いっぱいに表示(ディスプレイが低解像度の場合オススメ)
/home/pi/MagicMirror/css/custom.cssを新規作成し、そこにスタイルシートを記載すると、設定を上書きすることができます。/home/pi/MagicMirror/css/main.cssやモジュール内のcssファイルを修正すると、バージョンアップ時に上書きされてしまいますので、元のcssファイルを見ながら、修正したい項目をcustom.cssにコピーして修正します。
いくつか自分が追加した例を載せますので、custom.cssに追加してみてください。
body {
  margin: 0px;
  padding: 0px;
  height: 100%;
  width:  100%;
}
.region.fullscreen {
  position: absolute;
  top: 0px;
  left: 0px;
  right: 0px;
  bottom: 0px;
  pointer-events: none;
}
.region.fullscreen.below {
    position: absolute;
    top: 0px;
    left: 0px;
    right: 0px;
    bottom: 0px;
}
表示フォントを変更する
デフォルトのフォントデザインは簡体字に寄っていて読みにくいので、フォントをインストールして変更します。個人的に好きなMigMix 1Pに変えてみます。
フォントのインストール
sudo apt-get install fonts-migmix
/home/pi/MagicMirror/css/custom.cssに追加します。
body {
  font-family: "MigMix 1P", "Roboto Condensed", sans-serif;
}
.light {
  font-family: "MigMix 1P", "Roboto Condensed", sans-serif;
  font-weight: 300;
}
.regular {
  font-family: "MigMix 1P", "Roboto Condensed", sans-serif;
  font-weight: 400;
}
.bold {
  font-family: "MigMix 1P", "Roboto Condensed", sans-serif;
  font-weight: 700;
}